
In…
What to do if Fortnite keep crashing
If you’re an avid fortnite keep crash experiencing frequent game crashes can be frustrating and disruptive to your gameplay experience.
However, there are a few steps you can take to troubleshoot and potentially resolve the issue. Firstly, make sure your computer or gaming system meets the recommended hardware requirements for running Fortnite smoothly.
Fortnite Error:https://www.mrlearningway.com/fix-fortnite-error-code-91/
Outdated or incompatible drivers may also be the cause, so it’s essential to keep them up to date. Next, verify the integrity of the game files through the Epic Games Launcher, which can help identify and fix any corrupted files.
Additionally, adjusting your in-game settings, such as lowering graphics quality or disabling overlays, can reduce the strain on your system and minimize crashes.
Lastly, if all else fails, reaching out to Epic Games’ customer support and submitting a bug report can provide further assistance in resolving the persistent crashing issue.
How to Fix Fortnite Crash and Technical Issues
fortnite keep crash the immensely popular battle royale game, occasionally encounters technical glitches that can lead to frustrating crashes and gameplay disruptions.
- Fortunately, there are a few troubleshooting steps you can take to alleviate these issues and get back to conquering the virtual battlefield.
- Firstly, ensure that your system meets the minimum requirements to run the game smoothly. Update your graphics drivers regularly as outdated drivers can cause crashes.
- Clearing the game cache can also help resolve technical hiccups. Additionally, optimizing your PC’s performance by closing unnecessary background programs and disabling overlays can enhance gameplay stability.
- If all else fails, reinstalling the game or seeking support from the official fortnite crash often provide further solutions.
By following these steps, you can tackle Fortnite crashes head-on and continue to enjoy the exhilarating gaming experience it offers.
Repair Easy Anti-Cheat:
- Navigate to the Fortnite installation folder on your computer
- located in “C:\Program Files\Epic Games\Fortnite\FortniteGame\Binaries\Win64\EasyAntiCheat”. or “C:\Program Files (x86)\EasyAntiCheat”.

- Locate and run the “EasyAntiCheat_Setup.exe” file.
- Choose Fortnite from the list and click on “Repair Service.”
Reinstall/Update Graphics card
- AMD Official Website:https://www.amd.com/en/support
- Nvidia Graphics driver:https://www.nvidia.com/download/index.aspx
Update Visual C++ Redistributable Package
One of the most common causes of this error is an outdated or corrupted Visual C++ Redistributable Package. To fix this, follow these steps:
-
- Go to open the Crome Browser.
-
- Type the Microsoft Visual C++ download and search it.
- See the official page Microsoft C++ redistributable and click the open it

-
- Get download Visual Studio’s latest software
- Check your system 32bit or 64bit.Below
-
- X64 Visual C++
- or
-
- X86 Visual C++
- Get Link Download and installed the Microsoft Visual C++ Software.
How to Stop Fortnite from Crashing
fortnite keep crash has become one of the most popular video games worldwide, captivating millions of players with its addictive gameplay and vibrant graphics.
However, it can be incredibly frustrating when the game crashes unexpectedly, interrupting your immersive experience.
Luckily, there are a few troubleshooting steps you can take to minimize or even eliminate these crashes. Firstly, ensure that your computer’s hardware meets the game’s minimum requirements.
Updating your graphics card driver and operating system can also resolve compatibility issues that might lead to crashes.
Additionally, fortnite keep crash relies on a stable internet connection, so checking your network settings and ensuring you have a strong signal can make a significant difference.
Lastly, closing unnecessary background applications before launching the game can free up system resources and prevent crashes caused by conflicts.
By following these simple tips, you can enjoy a smooth fortnite crashes randomly gaming experience without the frustration of crashes.
Why does Fortnite keep crashing
This question has been plaguing gamers worldwide, causing frustration and disappointment among avid players.
There are several potential reasons behind this recurring issue. Firstly, the game’s popularity and the sheer number of players could potentially overload the servers, leading to crashes and connectivity issues.
Additionally, outdated or incompatible software, such as graphics drivers or operating systems, may also contribute to frequent crashes.
Furthermore, glitches within the game’s code and lack of proper optimization on certain devices can result in instability. Lastly, unexpected or sudden updates and patches may introduce new bugs and crashes that need to be resolved by developers.
As Fortnite evolves and continues to attract millions of players, it is crucial for the developers to address and resolve these Fortnite crashing issues promptly to ensure an enjoyable gaming experience for all.
Read More:


Imagine being in the heat of the battle in Valorant, strategizing each move with your team, when suddenly your valorant ping spikes, throwing off your aim and leaving you frustrated.
You instantly blame your internet connection, assuming there must be some issue with your provider.
But what if I told you that your internet is actually fine? Yes, it’s true – many players experience unexplainable ping spikes in Valorant, even when their internet connection seems to be running smoothly.
In this blog post, we will delve into the possible causes behind these frustrating ping spikes valorant and explore potential solutions that can help you maintain a stable connection while dominating the Valorant battlefield.
[ez-toc]
How to Fix Ping Spikes in Valorant
Ping spikes can be extremely frustrating when trying to enjoy a smooth and uninterrupted gaming experience, especially in a fast-paced game like Valorant. However, with a few simple steps, you can minimize and possibly eliminate those annoying ping spikes.
Firstly, make sure to close any unnecessary background applications and processes that might be consuming your internet bandwidth. This includes downloads, streaming services, or even multiple browser tabs. Secondly, check your internet connection stability and speed.
If you’re using Wi-Fi, try switching to a wired connection to minimize any potential signal interference. Additionally, ensure that your router firmware is up to date.
Lastly, consider contacting your Internet Service Provider (ISP) to address any potential network congestion or connectivity issues. By following these steps, you can significantly improve your ping stability and enjoy valorant ping spikes gaming experience.
why does my ping spike in valorant
This is a question that many avid gamers have pondered. valorant ping spikes, a popular online multiplayer game, requires seamless and near-instantaneous communication between players and the game server.
However, nothing is more frustrating than experiencing sudden valorant ping spikes causing lag and disrupting gameplay.
There can be several reasons for these fluctuations in ping. First and foremost, it could be an issue with your internet connection or network congestion. Other devices connected to your network, large file downloads, or streaming services may compete for bandwidth, leading to increased ping.
Additionally, geographical distance between the game server and your location ping spiking valorant lag spikes. The farther you are from the server, the longer it takes for data to travel, resulting in higher latency.
Finally, server issues or maintenance work on Valorant’s end can also temporarily affect your ping.
As a player, it’s important to understand these potential causes and take necessary steps, such as troubleshooting your network, verifying server statuses, or considering switching to a more stable connection, to ensure a smooth and enjoyable gaming experience.
How to Fix Random Ping Spikes in Valorant
Valorant, Riot Games’ competitive first-person shooter, delivers an immersive gaming experience that requires precise reactions and smooth gameplay.
However, few things are as frustrating as experiencing random ping spikes during crucial moments.
1.Run as an administrator
- You’re selected for Desktop showing Valorant App.
- After Clicking on the Mouse.
- Then Select the Properties click.
- Now, Show the top panel in Compatibility.
- After below you select the Compatibility Mode
- Next, Choose the option Windows 8.
- Below Choose this option.
✅Disable full-screen optimizations
✅Run this program as an Administrator
- After trying to Roblox open to play the game.
3. Change the DNS address
Press the win+x key and click the Run to open it.

After typing the command ncpa. cpl and ok click.

Now open it for the Network connection tab.
Then right-click on your connecting network adapter.

Select the Properties.
Find Internet Protocol version 4 (TCP/IPv4) by clicking on it.
Below click Properties and select Use the following DNS server Addresses.

Given the use of this value DNS server:
Preferred DNS server: 8.8.8.8
Alternate DNS server: 8.8.4.4
(OR)
Preferred DNS server: 1.1.1.1
Alternate DNS server: 1.0.0.1 Press OK and close the All tab.
It’s also essential to update your network valorant ping spikes itself to the latest versions, as outdated software can cause compatibility problems.
conclusion valorant ping spikes
Lastly, using a wired connection instead of Wi-Fi can eliminate interference and provide a more stable connection.
By following these steps, you can minimize random ping spikes in Valorant and maximize your gaming performance.
- After Apply button click the ok click.
2. Reset IP configuration
- Go to the Search bar and click type cmd.
- Command prompt right-click Run as an administrator click.

- After Yes click to open its command prompt.
- Below is the command following copy and paste to press enter.
Ipconfig /flushdns
Ipconfig /release
Ipconfig /all
Ipconfig /renew
netsh winsock reset
- After trying to Roblox open to play the game.
3. Change the DNS address
Press the win+x key and click the Run to open it.
After typing the command ncpa. cpl and ok click.
Now open it for the Network connection tab.
Then right-click on your connecting network adapter.
Select the Properties.
Find Internet Protocol version 4 (TCP/IPv4) by clicking on it.
Below click Properties and select Use the following DNS server Addresses.
Given the use of this value DNS server:
Preferred DNS server: 8.8.8.8
Alternate DNS server: 8.8.4.4
(OR)
Preferred DNS server: 1.1.1.1
Alternate DNS server: 1.0.0.1 Press OK and close the All tab.
It’s also essential to update your network valorant ping spikes itself to the latest versions, as outdated software can cause compatibility problems.
conclusion valorant ping spikes
Lastly, using a wired connection instead of Wi-Fi can eliminate interference and provide a more stable connection.
By following these steps, you can minimize random ping spikes in Valorant and maximize your gaming performance.

In today’s fast-paced digital era, broken laptop screen have become an essential tool for both personal and professional use.
They offer convenience, mobility, and efficiency; however, one common issue that laptop users often encounter is a broken screen.
A broken laptop screen can be a major setback, hindering productivity and causing frustration.
It not only affects the visual aesthetics of the device but also disrupts workflow and creates a sense of helplessness.
In this blog post, we will delve into the repercussions of a broken fix screen laptop explore the reasons behind these occurrences, and provide valuable insights on how to prevent and address this troublesome glitch in productivity.
[ez-toc]
how to fix laptop screen
- The laptop screen is one of the most critical components of any portable computer. But what do you do when it starts displaying random colors, flickers intermittently, or remains completely black.
- Don’t panic, as there are several steps you can take to troubleshoot and potentially resolve the issue on your own.
- Begin by checking the display settings and ensuring the brightness is set appropriately. If that doesn’t work, try connecting an external monitor to determine if it’s a hardware or software problem.
- Check Graphics driver: Updating your graphics driver to the latest version might also resolve any compatibility issues.
- Checking internet: In some cases, a physical connection problem could be the culprit, so inspect the cable connecting the screen to the laptop’s motherboard.
- If all else fails, it might be necessary to seek professional assistance or consider replacing the laptop screen altogether.
Remember, with some patience and the right troubleshooting techniques, you can often fix a laptop screen issues without the need for costly repairs.
2.Check for driver updates
Press the Windows key + X and select “Device Manager” from the menu.
In the Device Manager window,

expand the categories and locate any devices with a yellow exclamation mark icon.
Right-click on the device and select “Update driver.”
Choose the option to automatically search for updated driver software.
If any updates are found, follow the on-screen instructions to install them.
can you fix a laptop with a broken screen
As a professional blog post writer, I’m here to address a common concern among laptop users – can you fix a laptop with a broken screen.
The answer, fortunately, is yes! A broken laptop screen can be a frustrating and unsettling experience, but rest assured that you have options when it comes to resolving this issue.
While it may initially seem daunting, repairing a broken laptop screen is entirely possible and can often be more cost-effective than purchasing an entirely new device.
With the advancement of technology, various methods and resources are available for fixing a broken laptop screen, ranging from DIY solutions to seeking professional assistance.
By choosing the right approach and following a few simple guidelines, you fix a laptop screen back to full functionality in no time.
how to fix broken laptop screen
A broken laptop can be a frustrating experience, especially if you rely on it for work or personal use.
However, before giving in to panic or rushing to the nearest repair shop, consider a few troubleshooting steps that could potentially save you time and money. The first step is to identify the problem.
Is it a physical damage, a software issue, or a combination of both? Physically inspect the laptop for any visible damages, such as a cracked screen or loose connections.
conclusion broken laptop screen
If there are no obvious physical issues, try restarting the laptop to see if it resolves any minor software glitches.
Should these initial troubleshooting steps fail, fear not, for there are still several options to explore before seeking professional assistance.
If you’re an avid Roblox player, you may have encountered the frustrating roblox error code 116.
This error typically occurs when there’s an issue with the Roblox client and it fails to properly establish a connection with the game’s server.
Users often experience error code 116 when their internet connection is unstable or when there are firewall or antivirus settings blocking the game’s access.
The error can be quite disruptive, especially when you’re in the middle of an exciting gameplay session.
But fear not, there are several troubleshooting steps you can take to fix error code 116 and get back to enjoying your favorite Roblox games without interruption.
[ez-toc]
Why this Roblox error code 116
If you’re an avid Roblox player, you may have encountered error code 116 at some point, leaving you pondering what it means and why it keeps appearing.
Error code 116 is a common issue that players encounter while playing Roblox games.
It typically occurs when there are connection problems between the player’s device and Roblox’s servers.
This error can be frustrating as it disrupts the gameplay experience and prevents players from fully immersing themselves in the virtual world of Roblox.
However, with a better understanding of why this error code occurs, you can take steps to troubleshoot and resolve the issue, allowing you to get back to enjoying your favorite Roblox games without interruption.
how to fix Roblox error code 116
1. Update your graphics card driver:
Visit the website of your graphics card manufacturer and check for any available driver updates. Download and install the latest driver version compatible with your system.
2. Restart your computer:
After installing the updated driver, restart your computer to ensure the changes take effect.
3. Adjust Roblox graphics settings:
Open the Roblox application and navigate to the Settings tab. Lower the graphics settings to a more optimal level for your system. This may help mitigate any compatibility issues with your graphics card.
4. Disable unnecessary background processes:
Some background processes or applications may conflict with Roblox, resulting in the error code 116. Close any unnecessary programs running in the background to free up system resources.
5. Check for Windows updates:
Ensure your operating system is up to date by checking for any available Windows updates. These updates often include bug fixes and performance enhancements that may help resolve the error.
By following these steps, you should be able to fix the Roblox error code 116 and enjoy a seamless gaming experience on the platform. Remember to always keep your graphics card driver updated and periodically check for Roblox updates to avoid encountering similar errors in the future.
other methods
Roblox, the popular online gaming platform, is renowned for its vast array of games and vibrant community.
However, encountering roblox error code 116 can occasionally disrupt your immersive gameplay experience.
But worry not, as we have got you covered with effective solutions to fix this issue.
To begin, it is important to understand that roblox error code 116 typically occurs due to graphics card-related problems.
One of the simplest solutions is updating your graphics card driver to the latest version, ensuring optimal performance and compatibility with Roblox.
Additionally, checking for any pending Windows updates and installing them can also resolve this error.
Furthermore, ensuring that your system meets the minimum requirements, clearing cache and cookies, or re-installing Roblox can be other troubleshooting steps to consider.
By following these steps, you can bid farewell to error code 116 and swiftly return to enjoying the captivating world of Roblox.
conclusion
In conclusion, the Roblox Error Code 116 is a common issue faced by players, but it can be easily resolved by following a few troubleshooting steps.
This error typically occurs when there is an issue with the player’s internet connection or when there are conflicts with the game’s server.
To resolve this error, players should first check their internet connection and ensure that it is stable.
They can also try restarting their router or switching to a different network if possible.
Additionally, clearing the cache and temporary files on their device can help resolve any conflicts with the game’s server.
By following these simple steps, players can quickly overcome the Roblox Error Code 116 and continue enjoying their gaming experience without any interruptions.
About Valorant Error Code 7, it is a frustrating issue that many players have encountered. The error code indicates a problem with the game’s anti-cheat system, Vanguard.
It typically occurs when the Vanguard software fails to install or update correctly, causing the game to fail to launch. To resolve this issue, players are advised to try restarting their PC, updating their graphics drivers, and running the game as an administrator.
However, in some cases, more advanced troubleshooting steps may be necessary, such as uninstalling and reinstalling the game or Vanguard software.
As Valorant continues to gain popularity among gamers worldwide, it is crucial for developers to address and fix these technical issues to ensure a smooth and enjoyable gameplay experience for all players.
[ez-toc]
WHY THIS VALORANT ERROR CODE 7
Why this Valorant error code 7 occurs is a common question asked by many gamers. This error code usually appears during the installation or updating process of the game. It signifies a server-related issue that prevents players from completing the installation or update.
The valorant Error Code 7 may appear if there are network connectivity issues, server maintenance, or server overload. https://www.youtube.com/embed/fQMSFzQ32d4?si=WzSfgWTAXrw7_3Qe
It can also indicate problems with the game files, including corrupted or missing files. Whatever the cause may be, players are advised to troubleshoot the issue and ensure that they have a stable internet connection before attempting to install or update the game.
How to fix valorant vanguard
1.Change the DNS address
Press the win+x key and click the Run to open it.
After typing the command ncpa. cpl and ok click.
Now open it for the Network connection tab.
Then right-click on your connecting network adapter.
Select the Properties.
Find Internet Protocol version 4 (TCP/IPv4) by clicking on it.
Below click Properties and select Use the following DNS server Addresses.
Given the use of this value DNS server:
Preferred DNS server: 8.8.8.8
Alternate DNS server: 8.8.4.4
(OR)
Preferred DNS server: 1.1.1.1
Alternate DNS server: 1.0.0.1 Press OK and close the All tab.
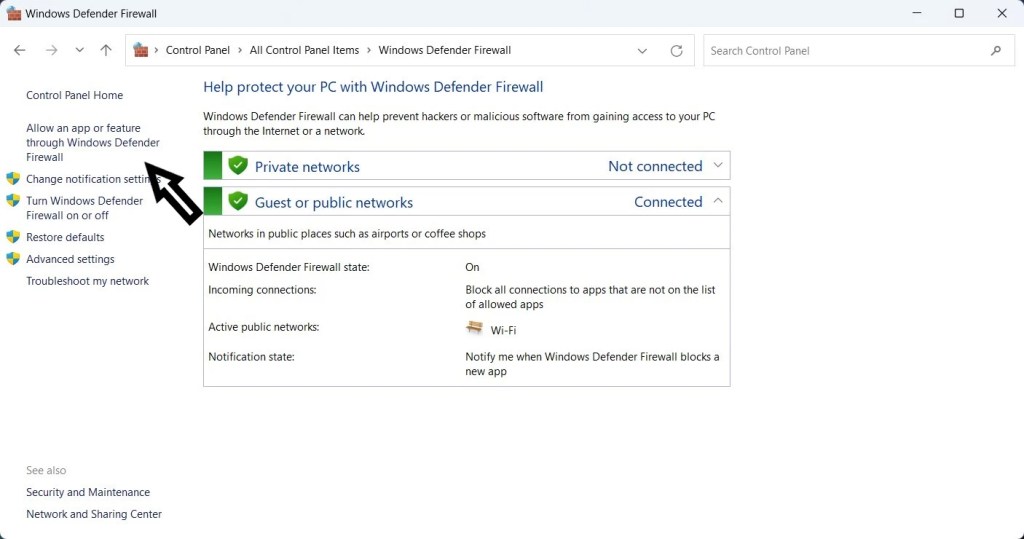
2.Allowing Valorant Through Windows Defender Firewall:
-
- Type “Windows Defender Firewall” in the Windows search bar and select the windows defender firewal.

- Click on Allow an App or Feature Through Windows Defender Firewall.
- In the left panel of the Firewall settings window, click on the option labeled Allow an app or feature through Windows Defender Firewall.

- Click on “Change Settings” (Administrator Permission May Be Required):
- If prompted for administrator permission, click on Change settings to modify the firewall settings.
- Scroll through the list of apps and features until you find “Valorant.” If it’s not listed, click the “Allow another app…” button and browse for the Valorant executable file.

- Click the “Browse” button and navigate to the folder where Valorant is installed (usually “C:\Riot Games\VALORANT”).
- Select the “VALORANT-Win64-Shipping.exe” file and click “Open.”

- In the same row as “Valorant,” make sure both the “Private” and “Public” checkboxes are checked. This allows Valorant to communicate on both private and public networks.
-
- Click “OK” to Save Changes.
- Once you’ve selected “Valorant” and configured the appropriate checkboxes, click the “OK” button to save your changes.


CMD
- sc delete vgc
- sc delete vgk
HOW TO FIX VALORANT ERROR CODE 7
Are you an avid valorant van player frustrated with encountering the dreaded Error Code 7. Fear not, as I’m here to guide you through the process of fixing van-1 this error and getting back to enjoying the game.
Error Code 7 often occurs due to errores valorant server issues, but there are a few steps you can take to resolve it. Firstly, ensure that your internet connection is stable and check if Valorant’s servers are online and running smoothly. If the issue persists, try restarting your computer and launching the game again.
conclusion
If none of these methods solve the problem, you may need to contact Valorant’s support team, who can provide further assistance specific to your situation.
By following these steps, you’ll be back in the game and experiencing the thrilling world of valorant van 1 without being hindered by Error Code 7.
Roblox not responding is a massively popular online gaming platform, boasting millions of active users every day.
However, even the most cutting-edge technology is not immune to glitches, and many players have reported issues with Roblox not responding.
This frustrating problem can prevent players from accessing their accounts or playing their favorite games, leaving them feeling frustrated and unsure how to proceed.
[ez-toc]
In this blog post, we’ll explore some of the reasons why Roblox may not be responding and offer some tips and tricks for resolving the issue.
Whether you’re a seasoned Roblox player or a newcomer to the platform, this post will help you get back to gaming in no time!
how to fix roblox not responding
Have you ever encountered the frustration of Roblox not responding when you’re eagerly trying to dive into an immersive gaming experience.
Don’t worry, you’re not alone! This article will guide you through some effective troubleshooting solutions to help fix the issue and get you back to exploring Roblox’s vast virtual world.
The first step to resolving this problem is to ensure that your device meets the minimum system requirements for running Roblox smoothly.
Update your graphics drivers, clear any unnecessary files, Roblox connection and optimize your computer’s performance. Additionally, try disabling any conflicting antivirus software or firewalls that might be hindering Roblox’s connectivity.
Restarting your internet router or switching to a wired connection may also eliminate any connectivity issues causing Roblox to become unresponsive.
Lastly, reinstalling the Roblox application can often resolve any software-related glitches that may be impeding its functionality.
By following these steps, you can say goodbye to the frustration of Roblox not responding and rediscover the joy of immersive gameplay.
1.Restart the computer
-
- Press the start menu and click here.
- Now the power key icon click here.

- After showing the Restart click.

2.Roblox repair and reset app
- Go to Search bar after type Settings click here.

- After opening it then select Apps click here.
- Press Apps & Feature Settings.
- Find out Roblox App click it.
- Then three dots click to Advanced apps select.
- Go to Below After Repair and Reset click on it.
3.Update Roblox
- Open the Microsoft store.
- Search Roblox.
- Click to update the roblox.
4.Uninstall Roblox
- Go to Search bar after type Settings click here.
- After opening it then select Apps click here.
- Press Apps & Feature Settings
- Find out Roblox App click it.
- Then three dots click to Uninstall app.
5.Reinstall Roblox
- Go to Browser click to open it.
- Search the https://www.roblox.com/download this website.
- Download the Web version Roblox client version.
- Install the Roblox client app and launch the game.
- After sign in your account then you’re finished.
- Playing game in Roblox client version.
Conclusion:
These simple steps could help resolve the Roblox not responding issue. If it still persists, try restarting your computer or device.
Another option is to disable unnecessary programs or background processes that may be consuming your system resources.
With these quick solutions, you can quickly get back into the game without any interruptions.
When it comes to immersive and visually stunning open-world role-playing games, few titles can match the sensation that Genshin Impact on pc has created since its release in September 2020.
Developed by miHoYo, this free-to-play action RPG has taken the gaming community by storm, capturing the hearts of millions of players worldwide.
While initially tailored for mobile devices, Genshin Impact on PC version that provides an even more seamless and breathtaking gaming experience.
In this blog post, we will explore the steps to download Genshin Impact on PC and delve into the reasons why this version of the game is a must-try for both newcomers and experienced gamers.
Let’s embark on an epic journey through the stunning world of Teyvat right from the comfort of your PC screen.
[ez-toc]
how to get genshin impact on pc
Are you eager to enjoy the breathtaking world of Teyvat in Genshin Impact on your computer? Look no further, as we guide you through the simple steps to embark on this breathtaking adventure.
To get started, you’ll first need to visit the official Genshin Impact website. Once there, head to the “Download” section and click on the appropriate icon for your Windows operating system.
This will initiate the download of the game installer. Once the download is complete, run the installer and follow the on-screen instructions.
After the installation, launch the game and voila! You’re now ready to explore the enchanting landscapes, unravel the mysteries, and unleash your elemental powers in Genshin Impact’s immersive experience on your PC.
how to download genshin impact pc
Genshin Impact has taken the gaming world by storm with its breathtaking visuals, immersive open-world environment, and engaging gameplay.
If you’re eager to embark on this extraordinary adventure on your PC, you’ll be thrilled to know that downloading Genshin Impact is a breeze.
Begin by visiting the official website, miHoYo’s platform, or popular gaming distribution platforms such as Steam and Epic Games Store. Look for the dedicated Genshin Impact page and ensure your PC meets the minimum system requirements.
Once verified, simply click on the “Download” button which will begin the installation process. Follow the on-screen prompts, select your preferred installation location, and patiently wait for the game to be installed.
In a matter of minutes, you’ll find yourself  ready to traverse the enchanting land of Teyvat and uncover its secrets in Genshin Impact. Let the adventure begin!
Where to Download Genshin Impact on PC
If you’re a fan of immersive open-world role-playing games, then you must have heard of Genshin Impact. This highly anticipated game has taken the gaming community by storm with its breathtaking visuals, captivating storyline, and engaging gameplay.
If you’re eager to dive into this fantastical world and experience the adventures it holds, knowing where to download Genshin Impact on PC is crucial. The most reliable platform to download this gem is directly from the official miHoYo website.
Simply visit their website, navigate to the Genshin Impact section, and follow the prompts to download and install the game on your PC.
conclusion
The miHoYo website ensures a secure and reliable download, guaranteeing that you won’t encounter any issues during the process.
So, don’t wait any longer, embark on your journey through Teyvat by downloading Genshin Impact on your PC today!

Discord server for fortnite has taken the gaming world by storm with its unique combination of building mechanics and battle royale gameplay.
With its massive player base and constant updates, Fortnite has become a cultural phenomenon.
As a result, the demand for a platform to connect with fellow players, discuss strategies, share tips and tricks, and find teammates has intensified.
Discord, the popular communication app designed specifically for gamers, has become the go-to platform for creating communities.
In response to this demand, numerous Discord servers have emerged, catering specifically to Fortnite players.
These servers offer a space for players to connect, discord server for fortnite and engage in lively discussions about the game.
Whether you’re looking for a professional competitive experience or simply seeking a casual group to enjoy the game with, joining a Fortnite-focused Discord server can be a game-changer for your overall Fortnite experience.
[ez-toc]
1.fortnite official discord servers
Fortnite Official Discord servers have become an integral part of the gaming community, offering players a platform to connect, strategize, and build friendships.
With millions of users worldwide, these servers serve as a hub for enthusiasts to share their adrenaline-fueled experiences, tips, and tricks.
Whether you’re a seasoned player seeking a competitive edge or a casual gamer looking to join forces with like-minded individuals, these Discord servers provide a sense of belonging and camaraderie.
From finding squads for Battle Royale to participating in exciting tournaments, the Fortnite Official Discord servers offer a diverse range of channels and opportunities for every player to immerse themselves in the exhilarating world of Fortnite.
It’s more than just a game; it’s a community that fosters collaboration, unity, and shared passion for the ever-evolving virtual battlegrounds.
2.epic games discord server
The Epic Games Discord server has emerged as a leading hub for gamers across the globe, fostering an unparalleled sense of camaraderie and excitement within the gaming community.
Designed to connect players, developers, and enthusiasts alike, this server serves as a remarkable platform for open discussions, sharing insights, and even forging new friendships.
With a user-friendly interface and a plethora of appealing features, the Epic Games Discord server has become an epicenter for gamers of all levels, transforming mere gaming sessions into unforgettable experiences.
Whether it’s the latest updates, troubleshooting guides, or a space to simply express one’s love for gaming, this thriving online community has proven to be a vital resource for all avid gamers.

3.How to Use Fortnite Official Discord Servers
Fortnite, the immensely popular multiplayer online game, has created an official discord server for fortnite players with a platform to communicate, collaborate, and connect with other Fortnite enthusiasts.
Utilizing the Fortnite official discord server for fortnite enhance your gaming experience and provide opportunities to find like-minded players to squad up with.
To get started, simply join the server by clicking on the server link provided on the Fortnite website or by using the invite link shared by other players.
Once you are in, take a moment to read the server rules and guidelines to ensure you adhere to the community standards. Familiarize yourself with the different channels available within the server, such as general chat, LFG (Looking for Group), trading, and competitive discussions.
Engaging in these channels allows you to find players to team up with, discover trading opportunities, seek advice, and participate in lively discussions about the game.
Remember to be respectful and considerate towards other players, as well as follow proper Discord etiquette. By utilizing the Fortnite official Discord servers effectively, you can forge valuable connections within the gaming community and elevate your Fortnite experience to new heights.

4.fortnite discord server full
Are you a passionate Fortnite gamer looking to elevate your gaming experience? Look no further than our incredible discord server for fortnite Packed with like-minded enthusiasts, this community is buzzing with the latest tips, tricks, and strategies to help you dominate the battlefield.
However, due to its immense popularity and dedicated members, we regret to inform you that our discord server for fortnite is currently full. But don’t worry! We are constantly expanding our server capacity to accommodate more gamers.
So stay tuned and keep an eye out for upcoming opportunities to join this thriving community.
- English Language server: Click here
conclusion discord server for fortnite
In the meantime, we encourage you to follow our social media channels for exciting updates, exclusive giveaways, and a glimpse into the amazing world of Fortnite.
Stay ready, Fortnite warriors, because a seat at our discord server for fortnite will soon be waiting just for you!
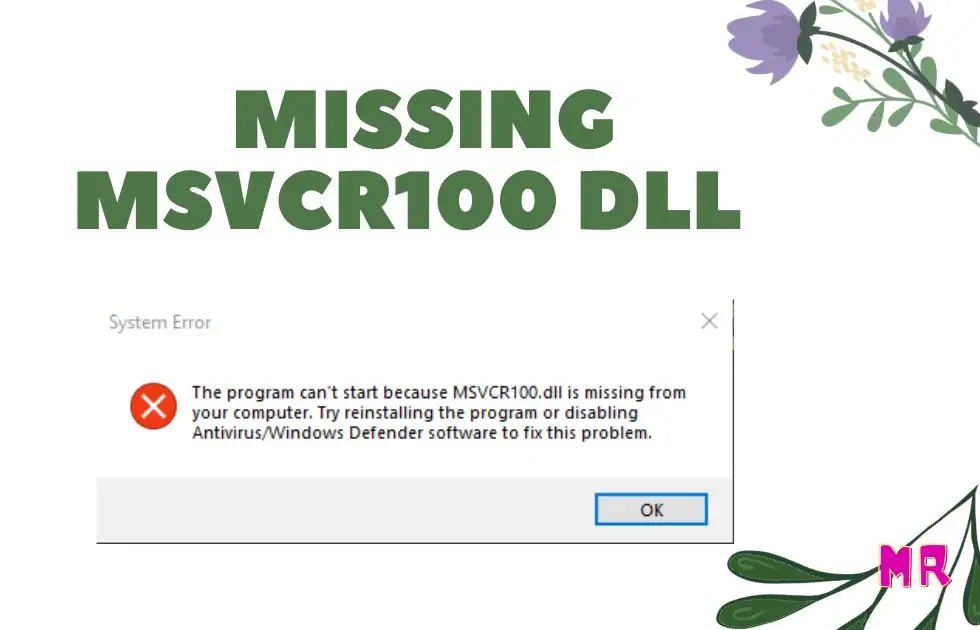
Errors and issues can be frustrating when it comes to using technology, and one such error that Windows 10 users may encounter is the missing msvcr100 dll not found” message.
This error occurs when the required msvcr100.dll file is either missing or corrupted on the system.
The msvcr100.dll file is an essential part of the Microsoft Visual Studio 2010 redistributable package, which many applications rely on to function properly.
Without this file, users may face compatibility problems and be unable to launch various programs.
In this blog post, we’ll explore the causes behind this error, its potential impacts, and most importantly, how to resolve it efficiently.
[ez-toc]
Why is this Windows 10 missing msvcr100.dll not found
The msvcr100.dll file is an important component of the Microsoft Visual C++ Redistributable package, which is required for running certain applications on Windows operating systems.
When this file is missing or not found, it can cause various issues and error messages to appear.
There can be several reasons behind the missing msvcr100 dll file error. One common reason is that the file may have been accidentally deleted or moved by the user or a third-party program.
In such cases, reinstalling the application that is showing the error message or the Microsoft Visual C++ Redistributable package might resolve the issue.
Another possible reason for the error is that the file may have been corrupted or damaged due to a malware infection or a faulty system update.
Running a thorough system scan using reliable antivirus software can help detect and remove any potential threats.
Furthermore, it is also worth checking if the system’s drivers are up to date. Outdated drivers, especially those related to software dependencies, can often cause DLL file errors.
Installing the latest Windows updates and drivers can ensure that all necessary components are present and functioning properly.
In some cases, manually downloading and replacing the missing msvcr100.dll file might be necessary.
It is crucial to obtain the file from a trusted source to avoid further complications.
Care should be taken while replacing missing msvcr100 dll files, as any mistakes can result in system instability.
Overall, the error message indicating a missing msvcr100 dll file can be frustrating, but with the appropriate troubleshooting steps, it can usually be resolved.
how to fix missing msvcr100 dll
- If you are facing the frustrating error message of “missing msvcr100 dll” while trying to run certain software or games on your Windows computer, don’t worry, as there are simple solutions to fix it.
- Microsft visual c++ Download: The msvcr100.dll file is a crucial component of the Microsoft Visual C++ Redistributable package, and its absence can disrupt the functioning of various applications.
- To rectify this issue, the first step you should take is to download the Microsoft Visual C++ Redistributable package from the official Microsoft website.
-
Check Operating system:
Double-check that you are installing the version that corresponds to your operating system, 32-bit or 64-bit. Once the installation is complete, restart your computer.
- In most cases, this straightforward procedure will resolve the missing msvcr100 dll error and allow you to use your desired software smoothly.
What is msvcr100 dll is missing
MSVCR100.dll is a crucial file within the Microsoft Visual C++ Redistributable package, which is required by various applications and programs developed using Microsoft Visual Studio.
When you encounter the error message stating “msvcr100 dll is missing,” it means that the respective DLL file is either corrupted, deleted, or not properly installed on your system.
This issue can arise due to a variety of reasons, such as malware infection, incomplete software installation, or system file corruption.
Nonetheless, it is essential to address this error promptly to ensure the smooth functioning of your desired applications.
Fortunately, there are several effective solutions available that can help resolve this issue and reinstate the missing msvcr100 dll file on your Windows operating system.
conclusion
In conclusion, the error message “msvcr100.dll not found” in Windows 10 can be a frustrating issue for users.
This particular DLL file is essential for running certain applications and games on the operating system.
However, there are several steps you can take to resolve this problem. Firstly, reinstalling or updating the Microsoft Visual C++ Redistributable package can help restore the missing DLL file.
Additionally, running a system file checker scan or performing a clean boot may pinpoint any underlying issues causing the error.
It is worth noting that downloading DLL files from third-party websites is not recommended, as they may be outdated or infected with malware. By following these steps and ensuring your computer is up to date, you can successfully overcome the “msvcr100.dll not found” error and enjoy a seamless Windows 10 experience.