
In…
The world of technology relentlessly pushes boundaries, constantly evolving to leave us in awe of its innovations. One such testament to this progress is the invincible crashing phenomenon.
As technology advances, so does its complexity and demand for greater reliability. However, even the most esteemed systems are not entirely impervious to occasional crashes.
These unexpected disruptions in the seamless flow of operations can often leave users bewildered and frustrated.
Nevertheless, understanding the invincible crashing and its underlying causes can empower us to mitigate its impact and enhance our technological experiences.
Why is the invincible crashing
A phenomenon that continues to captivate the minds of individuals across the globe? It is a question that has boggled the minds of aviation experts, conspiracy theorists, and general enthusiasts for decades.
The invincible crashing represents not only a tragic event but also a testament to the fragility of even the most sophisticated machinery we create.
It serves as a reminder that despite our best efforts and advancements in technology, there are still forces beyond our control.
Moreover, the invincible crashing challenges our idea of invincibility and serves as a stark reality check that no matter how invulnerable we may think we are, nature and circumstances can humble us in an instant.
How do i fix the invincible crashing:
1.Delete Local File Delete:
- Press the Windows key + R to open the Run dialog box.

- Type “localappdata%” and press Enter.
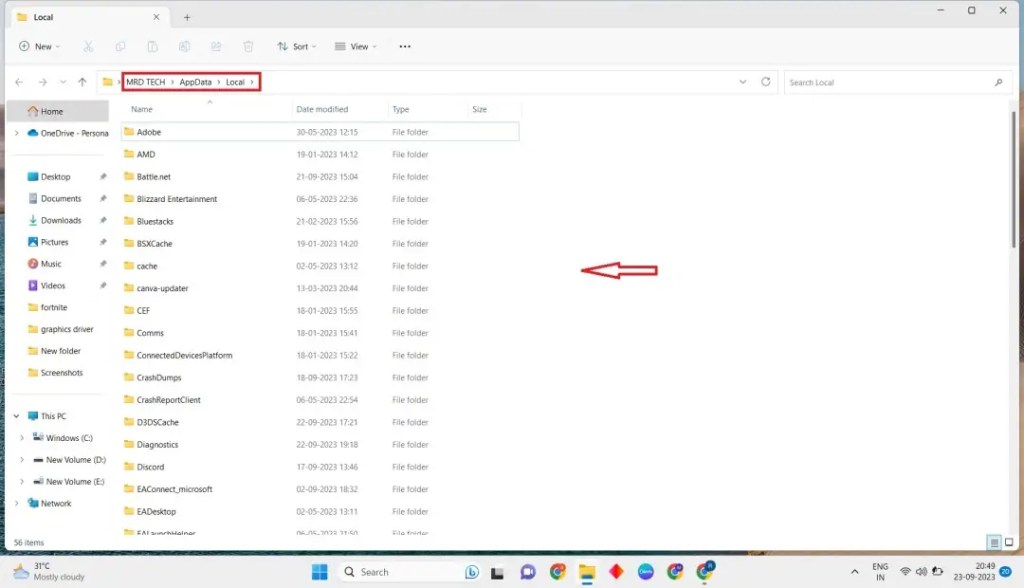
- Find out the the invincible game File.
- Navigate to the folder associated with the game you want to delete.
- Right-click on the game’s folder and select the Delete.
2.Update the Graphics driver
- Press “win+x” after clicking on Device Manager.
- Now open it then find Display Adapter click.

- Then Right-click to Update driver select.

- Now update the graphics driver.
or
Reinstall Graphics card
- AMD Official Website:https://www.amd.com/en/support
- Nvidia Graphics driver:https://www.nvidia.com/download/index.aspx
3.Set the Performance in Graphics settings✅
- Open the Settings and Select the Display.

- Go to Below and Find the Graphics.
- Select the Game and Open the Options.

- Click the High Performance.
Cause and issue the invincible crashing
the invincible crashing can be a frustrating and perplexing experience. Whether it be a crash in our computer systems, smartphone apps, or website servers, these unexpected crashes can disrupt productivity, cause data loss, and have a detrimental impact on the user experience.
The invincible crashing issue can stem from a variety of factors, such as software conflicts, hardware limitations, insufficient memory, or even coding errors.
However, in an age where technology is becoming increasingly integral to our personal and professional lives, finding effective ways to address and resolve these crashes is paramount to maintaining a smooth and efficient digital ecosystem.
Conclusion:
The invincible crashing is an inevitable reality in today’s fast-paced technological world. Despite our best efforts to enhance the stability and resilience of digital platforms, occasional glitches and system failures are bound to occur.
However, it is crucial to understand that such incidents do not define the overall performance or capabilities of the systems in question. Instead, they present an opportunity for growth and improvement. The invincible crashing serves as a wake-up call, reminding us of the need for continuous monitoring, maintenance, and frequent updates.
By prioritizing system reliability and investing in efficient troubleshooting measures, we can minimize the impact of these crashes and ensure a smoother user experience.
The journey towards an error-free digital landscape may be long and arduous, but with diligence and adaptability, we can overcome these challenges and strive towards a truly invincible future.
The highly anticipated release of Alan Wake 2 not launching has left fans crestfallen as the game fails to materialize. Despite eager expectations and a wave of pre-launch hype, the absence of an official launch date has stirred frustration and concern among loyal followers of the franchise.
Alan Wake, the critically acclaimed psychological thriller released over a decade ago, captivated players with its gripping narrative, memorable characters, and atmospheric gameplay. Its cliffhanger ending left fans eagerly awaiting a sequel, but the recent news of the game’s delay or possible cancellation has left them in despair.
In this blog post, we will explore the reasons behind Alan Wake 2 not launching failure to launch and delve into the impact this setback has had on the gaming community.
Why is Alan Wake 2 not launching?
This question has lingered on the minds of dedicated fans and gaming enthusiasts alike. Released back in 2010, the original Alan Wake game captivated players with its unique blend of psychological thriller and action-packed gameplay.
Its intriguing storyline, memorable characters, and innovative use of light as a weapon left players yearning for a sequel.
However, despite its critical acclaim and cult-like following, the sequel to Alan Wake has remained elusive, much to the disappointment of countless fans. But why has Remedy Entertainment, the developer behind the game, chosen not to continue the beloved franchise?
How do i fix Alan wake 2 Solution:
1.Delete Local Game File Delete:
- Press the Windows key + R to open the Run dialog box.
- Type “%localappdata%” and press Enter.
- Find out the Alan wake 2 not launch Game File.
- Navigate to the folder associated with the game you want to delete.
- Right-click on the game’s folder and select the Delete.
2.Update the Graphics driver
- Press “win+x” after clicking in Device Manager.

- Now open it then find Display Adapter click.
- Then Right-click to Update driver select.
- Now update the graphics driver.
3.Reinstall/Update Graphics Drivers:
- AMD Official Website:https://www.amd.com/en/support
- Nvidia Graphics driver:https://www.nvidia.com/download/index.aspx
4. Clear Temp File:
- Press the win+x key, click the Run open it.
- After typing the command %localappdata% and ok click.
- Find the Temp folder or file and open it.

- Insert select all file ctrl + A press.
- Delete from this file.
5.Verify the integrity of the game files
steam
- Open the launch, Go to the library.
- After clicking Lords of the Fallen then,
- see the new page and select properties.
- After opening it then select local files and click here.
- Press and click the verify integrity of the game file.
Directx 12 Download and Update
- Go to Browser and click to open it.
- Search the DirectX End User Runtime on this website.
- Show the download and install the DirectX software.

- Restart your device.
cause and issue alan wake 2
The cause behind the issue of Alan Wake 2 not launching can be attributed to various technical factors. One possible reason could be compatibility issues with the hardware or software configurations on the player’s gaming platform.
It’s essential to ensure that the system requirements are met, including graphics card capabilities, operating system versions, and available storage space. Another potential cause could be related to outdated or corrupted game files.
It is advisable to verify the game’s integrity or reinstall it to rule out any potential file-related issues. Moreover, conflicts with background applications or anti-virus software could also impede the game from launching successfully.
Adjusting the settings or temporarily disabling such programs may help in resolving this problem. Therefore, troubleshooting these common causes can often lead to the successful launch of Alan Wake 2 not launching, ensuring an enjoyable gaming experience for the players.
conclusion
In conclusion, fans of the beloved psychological thriller game, Alan Wake, have eagerly awaited the release of its highly anticipated sequel. However, it is disappointing to note that Alan Wake 2 not launching has not yet seen the light of day.
The lack of any official announcements or updates from the developers has left dedicated players feeling disheartened and anxious about the game’s future.
While it is unclear why Remedy Entertainment has not pursued the development of the sequel, it is evident that the absence of Alan Wake 2 not launching has created a void in the gaming community.
Despite the uncertainty, fans of the original game continue to hold onto hope, eagerly awaiting any news on the potential release of Alan Wake 2 not launching.
Game crashes on mobile devices can be frustrating and disruptive to your gaming experience. Whether you’re a casual gamer or a dedicated enthusiast, dealing with frequent games crashing can quickly diminish your enthusiasm for playing.
However, understanding the common causes of mobile game crashes and implementing effective solutions can help you get back to enjoying your gaming sessions uninterrupted.
In this blog post, we will explore some potential reasons behind games crashing on mobile devices and provide tips on how to resolve them. So, let’s dive in and find out how to fix those pesky crashes once and for all!
Why does this windows 11 games crashing?
This is a question that many frustrated gamers find themselves asking when faced with constant crashes and freezes during gameplay. While it can be incredibly frustrating to have your gaming experience constantly interrupted, it’s essential to understand that there can be various reasons behind these crashes.
One of the most common culprits is outdated or incompatible hardware or software. If your system does not meet the game’s requirements or if you haven’t updated your drivers,Games crashing are bound to occur.
Additionally, bugs and glitches within the game itself can lead to frequent windows 11 game crashes. Developers are constantly working on patching these issues, but sometimes it takes time to identify and resolve them all.
Lastly, it’s crucial to consider external factors such as overheating or inadequate ventilation, as these can also contribute to games crashing.
In any case, troubleshooting steps like updating drivers, checking system requirements, and ensuring proper system maintenance can help minimize the occurrence of crashes and provide a smoother gaming experience.
How to fix games crashing on pc
1. Update the Graphics driver
- After Apply button click the ok click.
Cause and Issues: Why Does Your Game Keep Crashing?
Are you frustrated with your game constantly crashing at the most inconvenient moments? You’re not alone! Games crashing are a common problem that many gamers encounter, and they can be incredibly frustrating.
how to fix game crashing? The causes of these crashes can vary, but some common issues include outdated or incompatible hardware drivers, insufficient system memory, overheating, or even software conflicts. Outdated graphics card drivers, for example, can lead to keep crashing as they struggle to process the demands of the game.
Similarly, if your computer lacks sufficient memory to handle the game’s requirements, crashes may occur due to overloaded resources. Overheating can also cause your windows 11 games crashing, especially if your computer’s cooling system is not functioning optimally.
Furthermore, conflicts between different software running simultaneously on your system can also be an underlying cause.
To resolve these issues, it is crucial to ensure that you have up-to-date hardware drivers, manage your system’s resources effectively, monitor temperatures, and close any unnecessary background processes.
By addressing these causes and issues, you can significantly reduce the occurrence of games crashing, leading to a smoother and more enjoyable gaming experience.
Conclusion: windows 11 game crashes
In today’s technologically advanced gaming world, it can be quite frustrating when a game keeps crashing unexpectedly.
This issue not only disrupts the immersive gaming experience but can also hinder progress and deter players from enjoying their favorite games to the fullest.
The root cause of game crashes can vary, ranging from software glitches to outdated hardware, or even conflicts with other programs running in the background.
Moreover, lack of system maintenance and updates can also contribute to this vexing problem. To combat games crashing, gamers should ensure that their software and drivers are up to date, clear out unnecessary files, and consider optimizing their system to enhance performance.
Additionally, reaching out to the game’s support team or engaging in forums with fellow gamers often proves helpful in identifying potential solutions.
While game crashes can be a nuisance, following these steps can increase the likelihood of a seamless, uninterrupted gaming experience.
- Open the Epic Games Launch, and Go to the Library.

- After right-clicking on Game,
- see the new page and select Properties.

- After opening it select local files Click here.
- Press and click the verify integrity of the game files.
3.Run as an administrator
- You’re selected for the Desktop showing the Games App.
- After Clicking on the Mouse.

- Then Select the Properties click.
- Now, Show the top panel in Compatibility.
- After below you select the Compatibility Mode.
- Next, Choose the option Windows 8.

- Below Choose this option.
✅Disable full-screen optimizations
✅Run this program as an Administrator
- After Apply button click the ok click.
Cause and Issues: Why Does Your Game Keep Crashing?
Are you frustrated with your game constantly crashing at the most inconvenient moments? You’re not alone! Games crashing are a common problem that many gamers encounter, and they can be incredibly frustrating.
how to fix game crashing? The causes of these crashes can vary, but some common issues include outdated or incompatible hardware drivers, insufficient system memory, overheating, or even software conflicts. Outdated graphics card drivers, for example, can lead to keep crashing as they struggle to process the demands of the game.
Similarly, if your computer lacks sufficient memory to handle the game’s requirements, crashes may occur due to overloaded resources. Overheating can also cause your windows 11 games crashing, especially if your computer’s cooling system is not functioning optimally.
Furthermore, conflicts between different software running simultaneously on your system can also be an underlying cause.
To resolve these issues, it is crucial to ensure that you have up-to-date hardware drivers, manage your system’s resources effectively, monitor temperatures, and close any unnecessary background processes.
By addressing these causes and issues, you can significantly reduce the occurrence of games crashing, leading to a smoother and more enjoyable gaming experience.
Conclusion: windows 11 game crashes
In today’s technologically advanced gaming world, it can be quite frustrating when a game keeps crashing unexpectedly.
This issue not only disrupts the immersive gaming experience but can also hinder progress and deter players from enjoying their favorite games to the fullest.
The root cause of game crashes can vary, ranging from software glitches to outdated hardware, or even conflicts with other programs running in the background.
Moreover, lack of system maintenance and updates can also contribute to this vexing problem. To combat games crashing, gamers should ensure that their software and drivers are up to date, clear out unnecessary files, and consider optimizing their system to enhance performance.
Additionally, reaching out to the game’s support team or engaging in forums with fellow gamers often proves helpful in identifying potential solutions.
While game crashes can be a nuisance, following these steps can increase the likelihood of a seamless, uninterrupted gaming experience.
- Press “win+x” after clicking on Device Manager.
- Now open it then find Display Adapter click.
- Then Right-click to Update driver select.
- Now update the graphics driver.
or
Reinstall Graphics card
- AMD Official Website:https://www.amd.com/en/support
- Nvidia Graphics driver:https://www.nvidia.com/download/index.aspx
2.Verify the integrity of the game files
- Open the Epic Games Launch, and Go to the Library.
- After right-clicking on Game,
- see the new page and select Properties.
- After opening it select local files Click here.
- Press and click the verify integrity of the game files.
3.Run as an administrator
- You’re selected for the Desktop showing the Games App.
- After Clicking on the Mouse.
- Then Select the Properties click.
- Now, Show the top panel in Compatibility.
- After below you select the Compatibility Mode.
- Next, Choose the option Windows 8.
- Below Choose this option.
✅Disable full-screen optimizations
✅Run this program as an Administrator
- After Apply button click the ok click.
Cause and Issues: Why Does Your Game Keep Crashing?
Are you frustrated with your game constantly crashing at the most inconvenient moments? You’re not alone! Games crashing are a common problem that many gamers encounter, and they can be incredibly frustrating.
how to fix game crashing? The causes of these crashes can vary, but some common issues include outdated or incompatible hardware drivers, insufficient system memory, overheating, or even software conflicts. Outdated graphics card drivers, for example, can lead to keep crashing as they struggle to process the demands of the game.
Similarly, if your computer lacks sufficient memory to handle the game’s requirements, crashes may occur due to overloaded resources. Overheating can also cause your windows 11 games crashing, especially if your computer’s cooling system is not functioning optimally.
Furthermore, conflicts between different software running simultaneously on your system can also be an underlying cause.
To resolve these issues, it is crucial to ensure that you have up-to-date hardware drivers, manage your system’s resources effectively, monitor temperatures, and close any unnecessary background processes.
By addressing these causes and issues, you can significantly reduce the occurrence of games crashing, leading to a smoother and more enjoyable gaming experience.
Conclusion: windows 11 game crashes
In today’s technologically advanced gaming world, it can be quite frustrating when a game keeps crashing unexpectedly.
This issue not only disrupts the immersive gaming experience but can also hinder progress and deter players from enjoying their favorite games to the fullest.
The root cause of game crashes can vary, ranging from software glitches to outdated hardware, or even conflicts with other programs running in the background.
Moreover, lack of system maintenance and updates can also contribute to this vexing problem. To combat games crashing, gamers should ensure that their software and drivers are up to date, clear out unnecessary files, and consider optimizing their system to enhance performance.
Additionally, reaching out to the game’s support team or engaging in forums with fellow gamers often proves helpful in identifying potential solutions.
While game crashes can be a nuisance, following these steps can increase the likelihood of a seamless, uninterrupted gaming experience.
Roblox Error Code 286 is a common problem faced by many Roblox players.
This error code usually occurs when a player experiences connectivity issues while trying to join a game or a server.
The error message that appears on the screen reads, “The Remote Server has disconnected you”.
Although this error can be frustrating, there are several ways to fix it.
Many users have found success in resolving the issue by simply restarting their device or resetting their internet connection.
However, if the problem persists, it may be necessary to contact customer support for further assistance.
why this roblox error code 286
Roblox has gained immense popularity among gamers all over the world, but just like any other online platform, it is not immune to errors.
One such error that players have been encountering frequently is Roblox Error Code 286.
This error usually occurs when the player’s device has connectivity issues with the Roblox servers.
It can also occur if the Roblox servers are experiencing technical glitches. The error code 286 can be frustrating for gamers who are unable to access their favorite games on Roblox.
However, there are a few simple steps that players can take to troubleshoot the error and get back to their games in no time.
How to fix roblox error code 286
1.Roblox Clear Cache & Clear date
- Roblox mobile app long press.
- After App info click.
- Now, Storage click to open.
- Clear cache and clear data on Roblox.
2.Update Roblox
- Go to Browser and click to open it.
- Search the Roblox Game this website.
- Download the Web version Roblox client version.
- Install the Roblox client app and launch the game.
- After signing in to your account you’re finished.
- Playing game in Roblox client version.
other methods
If you are encountering the frustrating Roblox error code 286, you’re in the right place to find a solution.
This error typically occurs when Lag on Roblox encounters some issues with connecting to its servers or verifying the user’s credentials.
To fix this error, start by ensuring that your internet connection is stable and try restarting your router/modem.
Additionally, clear your browser’s cache and cookies, then relaunch the Roblox app.
If the issue persists, consider temporarily disabling your antivirus or firewall settings as they might be interfering with the Roblox connection.
Updating your browser or reinstalling Roblox may also resolve the error. For a more comprehensive approach, reach out to Roblox support for further assistance.
By following these troubleshooting steps, you can hopefully overcome the Roblox error code 286 and enjoy a seamless gaming experience once again.
conclusion
In conclusion, the Roblox Error Code 286 is a common issue that many players encounter while trying to enjoy their gaming experience.
This error usually occurs when the game’s server fails to respond promptly, leading to connection problems and preventing users from accessing their favorite Roblox games and activities.
While this can be frustrating, there are several steps that players can take to troubleshoot and resolve this issue.
Firstly, ensuring a stable internet connection is crucial.
Additionally, clearing the browser cache and cookies, as well as disabling any conflicting browser extensions, can often help resolve Error Code 286.
It is recommended to keep the Roblox client and browser up to date for optimal performance and to reach out to the Roblox support team if the problem persists.
By following these steps, players can minimize disruptions and get back to enjoying their immersive Roblox experience.
Ghostrunner, the mesmerizing cyberpunk action game that took the gaming community by storm, had left players eagerly anticipating the release of its highly anticipated sequel, Ghostrunner 2 won’t launch.
However, to the dismay of fans around the world, it has recently been announced that Ghostrunner 2 won’t launching anytime soon.
This unexpected turn of events has left enthusiasts of the adrenaline-pumping game series feeling a mix of disappointment and curiosity, as they eagerly await an explanation from the developers behind this unfortunate delay.
In this blog post, we will explore the reasons for the postponed release, the impact it might have on the gaming community, and what we can hope for in the future of the Ghostrunner franchise.
Why This Ghostrunner 2 Won’t Launch: A Disappointment for Fans
As avid gamers eagerly wait for the much-anticipated sequel to the highly acclaimed Ghostrunner, the unfortunate truth looms over their heads: Ghostrunner 2 may not see the light of day anytime soon.
For many dedicated fans of the original game, this news comes as a bitter disappointment. The uncertainty surrounding the sequel’s launch is disheartening, especially considering the immense success and popularity of its predecessor.
While countless enthusiasts had their hopes high for an even more exhilarating experience in Ghostrunner 2, the current circumstances raise concerns that the long-awaited sequel might never come to fruition.
Though this may be disheartening news, it is essential to understand the various factors that contribute to this unfortunate situation and the challenges faced by game developers in bringing our much-loved titles to life.
How do I Fix Ghostrunner 2 Won’t Launch Solution:
1.Delete Local Game File Delete:
- Press the Windows key + R to open the Run dialog box.
- Type “localappdata%” and press Enter.
- Find out the Ghostrunner 2 Game File.
- Navigate to the folder associated with the game you want to delete.
- Right-click on the game’s folder and select the Delete.
2.Update the Graphics driver
-
Press “win+x” after clicking in Device Manager.
-
Now open it then find Display Adapter click.
-
Then Right-click to Update driver select.
-
Now update the graphics driver.
3. Clear Temp File:
- Press the win+x key, click the Run open it.
- After typing the command %localappdata% and ok click.
- Find the Temp folder or file and open it.
- Insert select all file ctrl + A press.
- Delete from this file.
4.Verify the integrity of the game files
-
Open the launch, Go to the library.
-
After clicking Lords of the Fallen then,
-
see the new page and select properties.
-
After opening it then select local files and click here.
-
Press and click the verify integrity of the game file.
Cause and Issues Ghostrunner 2 Won’t Launch
Despite the anticipation surrounding the highly-awaited sequel, Ghostrunner 2 won’t launch, numerous causes and issues have hindered its much-anticipated launch. Firstly, technical obstacles have plagued the game development process, causing unforeseen delays.
From programming bugs to compatibility issues, such challenges often arise during the intricate process of creating a high-quality gaming experience. Additionally, the ongoing global pandemic has further complicated matters, as it forced the development team to adapt to remote work environments, leading to potential communication and coordination setbacks.
Moreover, the complexity of incorporating innovative features and compelling narrative elements into Ghostrunner 2 crash has added significant pressure on the team, resulting in careful attention to detail and extensive testing.
While fans eagerly await the launch of Ghostrunner 2 won’t launch, it is essential to recognize the intricate obstacles that game developers face, highlighting their determination to deliver an exceptional product despite any setbacks experienced along the way.
Conclusion:
Despite much anticipation and excitement surrounding the release of Ghostrunner 2 won’t launch, it is disheartening to inform fans that the game won’t be launching anytime soon. While dedicated gamers were hoping to continue their thrilling adventures in the dystopian cyberpunk world, setbacks and challenges have ultimately led to the delay.
Yet, it is crucial to remember that games of this magnitude require time and effort to perfect, ensuring a seamless and unforgettable gaming experience.
From complex storytelling to intricate game mechanics, it is crucial for developers to take these necessary steps in order to create a truly immersive and enjoyable sequel.
Therefore, while the wait may be difficult, it’s important for fans to remain patient, as the creators undoubtedly strive to deliver an exceptional follow-up that surpasses all expectations.
The world of video game development is a complex and fascinating one, where countless hours of hard work, creativity, and dedication come together to create immersive and captivating experiences for gamers around the globe.
However, not every project manages to make it past the finish line unscathed. In this article, we delve into the unfortunate tale of Lords of the Fallen, a highly anticipated title that faced numerous setbacks and ultimately failed to launch.
This story serves as a valuable lesson for both developers and gamers alike, shedding light on the challenges and obstacles that can plague even the most promising of gaming ventures.
Let us explore the journey of Lords of the Fallen, unraveling its highs and lows, and discovering the valuable lessons it offers to aspiring game developers.
Why is this Lords of the Fallen out?
We find ourselves pondering this question as eager gamers await the highly anticipated release of a game that has garnered immense hype and excitement.
The anticipation surrounding Lords of the Won’t has reached a fever pitch, with dedicated fans eagerly following every bit of news and eagerly awaiting their chance to embark on an epic virtual adventure.
However, as the release date looms near, we find ourselves met with unforeseen delays and setbacks, leaving many to wonder what could be the cause of this prolonged wait.
Is it due to technical issues, a desire for perfection, or perhaps an unforeseen obstacle that developers are working tirelessly to overcome? Whatever the reason, the delay only heightens the suspense and intrigue, making the eventual launch of Lords of the Won’t all the more captivating and eagerly anticipated for both developers and gamers alike.
HOW TO FIX LORDS OF THE FALLEN WON’T LAUNCH?
1.Run as an administrator
- You’re selected for the Desktop showing Lords of the Fallen Game.
- After Clicking on the Mouse.
- Then Select the Properties click.
- Now, Show the top panel in Compatibility.

- After below you select the Compatibility Mode
- Next, Choose the option Windows 8.
- Below Choose this option.
✅Run this program as an Administrator


- After Apply button click the ok click.
2.Advanced system custom-size
- Go to the Search bar and click here.
- Type “About system” in the search bar and open the system

- In the System window, click on “Advanced system settings“
- This will open the System Properties dialog box.
- In the System Properties dialog, under the “Advanced” tab.

- Click on the “Settings” button in the Performance section.
- This will open the Performance Options dialog.
- In the Performance Options dialog, go to the “Advanced” tab.
- Under the “Virtual memory” section, click on the “Change…” button.
- Select the drive for which you want to set the custom page size.

- Choose the option “Custom size”.
Initial Size (in MB): RAM size * 1024 = value
Maximum Size (also in MB): Below the Same value
Click on the “Set” button, and then click “OK” to apply the changes.3.Update the Graphics driver
-
Press “win+x” after clicking in Device Manager.
-
Now open it then find Display Adapter click.
-
Then Right-click to Update driver select.
-
Now update the graphics driver.
4.Verify the integrity of the game files
-
Open the launch, Go to the library.
-
After clicking Lords of the Fallen then,
-
see the new page and select properties.
-
After opening it then select local files and click here.
-
Press and click the verify integrity of the game file
5. Clear Temp File:
- Press the win+x key, click the Run open it.
- After typing the command %localappdata% and ok click.
- Find the Temp folder or file and open it.
- Insert select all file ctrl + A press.
- Delete from this file.
6.Delete Local File Delete:
- Press the Windows key + R to open the Run dialog box.
- Type “localappdata%” and press Enter.
- Find out the Lords of the Fallen Game File.
- Navigate to the folder associated with the game you want to delete.
- Right-click on the game’s folder and select the Delete.
Is Lords of the Fallen going to be on PC?
Many gamers eagerly await the release of the highly anticipated action role-playing game, Lords of the Fallen. With its immersive storyline, stunning graphics, and challenging gameplay, it has captivated the attention of both console and PC gamers alike.
The question on the minds of PC gamers is: Is Lords of the Fallen going to be available on PC? Fortunately, the answer is a definitive yes. The developers have confirmed that the game will be coming to the PC platform, allowing players to experience the dark and atmospheric world of Lords of the Fallen on their preferred gaming setup.
This news is sure to excite PC gamers who have been eagerly anticipating the chance to embark on this epic adventure from the comfort of their own computers.
Conclusion
In the gaming world, one question that has been on the minds of many PC gamers is whether the highly anticipated game, Lords of the Fallen, will be released for their preferred platform.
Well, we can finally put those worries to rest and deliver the great news – yes, Lords of the Fallen will indeed be hitting the PC gaming scene! This exhilarating action role-playing game, developed by CI Games and Deck13 Interactive, garnered a massive following on console platforms when it was released a few years ago.
However, due to popular demand and the persistent requests of PC gamers, the developers have finally made the wise decision to bring this epic adventure to our beloved personal computers.
In the immensely popular world of strategy gaming, few titles have garnered as much love and admiration as the Total War series. With its intricate gameplay mechanics, breathtaking graphics, and immersive historical settings, the Total War franchise has captured the hearts of gamers worldwide.
Given the incredible success of the series, it comes as no surprise that fans eagerly await each new release with bated breath. However, among the eager anticipation for the next installment, one particular game has managed to garner attention for a rather unexpected reason – Total War: Pharaoh, the game that won’t stop launching.
Let us delve deeper into the phenomenon of this extraordinary game that continues to captivate and perplex enthusiastic gamers.
Why this Total War: Pharaoh Won’t Be Launching: A Delve into the Challenges of Game Development
In the ever-evolving world of video game development, there are bound to be occasional hiccups and setbacks. Unfortunately, the highly anticipated release of Total War: Pharaoh has hit a roadblock, leaving fans in dismay.
This unexpected delay has fueled speculation and disappointment among eager gamers. However, it is crucial to recognize the challenges faced by game developers in creating a seamless gaming experience. Every aspect of a game, from coding to design, demands meticulous attention and countless hours of work.
Such complexity brings forth unforeseen hurdles, be it technical difficulties, gameplay refinements, or even unforeseen circumstances. While the team at Total War is undoubtedly dedicated to delivering a masterpiece, it is vital to understand that the temporary delay in launching is a necessary step, ensuring that the final product lives up to the expectations of the loyal fanbase.
Patience is indeed a virtue, and developers are tirelessly working behind the scenes to bring forth an unforgettable gaming experience.
How do i fix Total War: Pharaoh Won’t launch
1.Run as an administrator
- You’re selected for Desktop showing Total War: Pharaoh Game.
- After Clicking on the Mouse.
- Then Select the Properties click.
- Now, Show the top panel in Compatibility.
- After below you select the Compatibility Mode
- Next, Choose the option Windows 8.
- Below Choose this option.
✅Run this program as an Administrator
- After Apply button click the ok click.
2.Advanced system custom-size
- Go to the Search bar and click here.
- Type “About system” in the search bar and open the system
- In the System window, click on “Advanced system settings“
- This will open the System Properties dialog box.
- In the System Properties dialog, under the “Advanced” tab.
- Click on the “Settings” button in the Performance section.
- This will open the Performance Options dialog.
- In the Performance Options dialog, go to the “Advanced” tab.
- Under the “Virtual memory” section, click on the “Change…” button.
- Select the drive for which you want to set the custom page size.
- Choose the option “Custom size”.
Initial Size (in MB): RAM size * 1024 = value
Maximum Size (also in MB): Below the Same value
Click on the “Set” button, and then click “OK” to apply the changes.3.Update the Graphics driver
-
Press “win+x” after clicking in Device Manager.
-
Now open it then find Display Adapter click.
-
Then Right-click to Update driver select.
-
Now update the graphics driver.
4.Verify the integrity of the game files
-
Open the launch, Go to the library.
-
After clicking Total War: Pharaoh then,
-
see the new page and select properties.
-
After opening it then select local files and click here.
-
Press and click the verify integrity of the game file
5. Clear Temp File:
- Press the win+x key, click the Run open it.
- After typing the command %localappdata% and ok click.
- Find the Temp folder or file and open it.
- Insert select all file ctrl + A press.
- Delete from this file.
6.Delete Local File Delete:
- Press the Windows key + R to open the Run dialog box.
- Type “localappdata%” and press Enter.
- Find out the Total War: Pharaoh Game File.
- Navigate to the folder associated with the game you want to delete.
- Right-click on the game’s folder and select the Delete.
In the realm of gaming, encountering issues that cause a highly anticipated title, such as Total War: Pharaoh, to be delayed or even fail to launch can be incredibly frustrating for both developers and eager gamers alike.
These issues can stem from a multitude of factors, ranging from technical complexities and unforeseen bugs to resource constraints and mismanagement within the development process.
Regardless of the underlying causes, the ramifications of such issues often lead to a state of total war within the gaming community, where dissatisfaction and disappointment sweep through the ranks of fervent fans eagerly awaiting the game’s release.
This volatile environment not only tarnishes the reputation of the developers but also undermines the trust of the loyal player base, emphasizing the significance of addressing these issues effectively and efficiently to prevent further damage.
Conclusion:
Ultimately, the decision to not launch Total War: Pharaoh has been met with mixed reactions from both the gaming community and fans eagerly awaiting its release.
While some argue that postponing the game’s launch allows developers to implement necessary improvements and refine the gameplay experience, others express disappointment and frustration over the prolonged wait.
However, it is crucial to recognize that the decision to delay the release of a highly anticipated game is never an easy one, as developers must balance the desire for perfection with meeting the demands and expectations of their fanbase.
In the end, the postponement of Total War: Pharaoh demonstrates the commitment of the developers to creating a game of exceptional quality, ensuring that fans can look forward to an immersive and captivating experience that exceeds their expectations upon its eventual launch.
Assassin’s Creed, a massively popular video game franchise known for its gripping narratives and immersive gameplay, returns with its latest installment titled “Mirage Crash.”
Developed by Ubisoft, this highly anticipated sequel promises to take players on a breathtaking journey through time and space, blending historical accuracy with fantastical elements.
In this blog post, we will delve into the captivating world of Assassin’s Creed Mirage Game Crash, exploring its intriguing storyline, enhanced gameplay mechanics, and the stunning visual experience it offers.
Get ready to become part of a mesmerizing adventure where past meets present and the boundaries of reality are blurred.
Why This Assassin’s Creed Mirage Crash Raises Concerns for Gamers
The recent revelation of the Assassin’s Creed Mirage crashing issue has caused an unprecedented storm within the gaming community.
Gamers all across the world are expressing their frustration and concern as this bug-induced crash brings their immersive gaming experience to an abrupt halt.
While glitches and bugs are not uncommon in video games, the magnitude and frequency of this particular crash have raised some serious doubts about the quality of the game’s development and its impact on players’ satisfaction.
The Assassin’s Creed series, known for its captivating narratives and stunning visuals, has always set the bar high for the gaming industry.
Unfortunately, this crash has tarnished that reputation, leaving gamers questioning the overall stability and reliability of future releases.
How do I fix Assassin’s Creed Mirage Game crash?
1. Run as an administrator
-
- You’re selected for Desktop showing Assassin’s Creed Miragegame.
-
- Right-clicking on the Mouse.
-
- Then Select the Properties click.
- Now, Show the top panel in Compatibility.
-
- After below you select the Compatibility Mode
-
- Next, Choose the option Windows 8.
-
- Below Choose this option.
✅Disable full-screen optimizations
✅Run this program as an Administrator
- After Apply button click OK.
2. Update the Graphics driver
-
- Press “win+x” after clicking on Device Manager.
- Now open it then find Display Adapter click.
- Then Right-click to Update driver select.
- Now update the graphics driver.
or
Reinstall Graphics card
- AMD Official Website:https://www.amd.com/en/support
- Nvidia Graphics driver:https://www.nvidia.com/download/index.aspx
3.Set the Performance in Graphics settings✅
- Open the Settings and Select the Display.
- Go to Below and Find the Graphics.
- Select the Game and Open the Options.
- Click the High Performance.
4. Install Visual C++ Redistributable Download
-
- Go to open the Chrome Browser.
-
- Type the Microsoft Visual C++ download and search it.
- See the official page Microsoft C++ redistributable and click the open it

-
- Get download Visual Studio’s latest software
- Check your system 32bit or 64bit
-
- X64 Visual C++
- or
-
- X86 Visual C++
- get installed the Microsoft Visual C++
5.Delete Local Assassin’s Creed File Delete:
- Press the Windows key + R to open the Run dialog box.
- Type “%localappdata%” and press Enter.
- Find out the Assassin’s Creed Mirage game crashing File.
- Navigate to the folder associated with the game you want to delete.
- Right-click on the game’s folder and select the Delete.
Assassin’s Creed Crase Mirage cause and issues
The latest installment in the widely popular Assassin’s Creed series, titled “Assassin’s Creed Mirage,” has recently encountered a significant crash issue that has left players frustrated and eager for a solution.
This crash, believed to be caused by a combination of factors, is causing the game to abruptly freeze or crash to desktop during gameplay, tarnishing what was supposed to be an immersive and thrilling experience.
The issues seem to stem from a variety of sources, including compatibility problems with specific hardware configurations, glitches within the game’s code, and even conflicts with certain software or drivers.
As game developers and enthusiasts eagerly await a fix, it is vital for the gaming industry to understand the disruptive effects such crashes can have on player satisfaction and the need for swift resolution to ensure the overall success of the game.
Conclusion:
The highly anticipated release of Assassin’s Creed Mirage was met with mixed reactions among players and fans of the iconic gaming franchise.
Unfortunately, the Mirage crash became a significant setback for both the game’s developers and the community. The technical issues and glitches present in the game hindered the overall immersive experience, leaving players frustrated and disappointed.
However, it is essential to acknowledge that such challenges are not uncommon in the gaming industry. Developers have a responsibility to ensure the stability and functionality of their creations, but unforeseen circumstances may sometimes lead to unforeseen outcomes.
Despite this setback, it is crucial to remember that the Assassin’s Creed franchise has a rich history of overcoming obstacles and delivering exceptional gameplay.
Fans can remain hopeful that the developers will address the crash issues promptly and deliver an improved gaming experience in the future.
As avid gamers eagerly awaited the highly anticipated release of Assassin’s Creed Mirage, disappointment Won’t launch to circulate when it became apparent that the game simply would not launch as expected.
Fans of the critically acclaimed franchise were left disheartened, wondering what could have caused such a setback. Delayed game releases have become increasingly common in the industry, but when it happens to a powerhouse franchise like Assassin’s Creed.
which has consistently delivered awe-inspiring gaming experiences, the impact is felt on a much larger scale. In this blog post, we will delve into the reasons behind the delayed release of Assassin’s Creed Mirage, the frustrations it has ignited among the gaming community, and the potential consequences this setback may have on the future of the franchise.
Why is Assassin’s Creed Mirage not launching?
This question has undoubtedly plagued fans and gamers alike who eagerly await the next installment in the iconic Assassin’s Creed series. While the anticipation continues to build, several factors could explain the delay.
One possibility is that the developers are investing more time and resources into creating a groundbreaking and immersive gaming experience. After all, the series has consistently delivered high-quality gameplay, captivating storylines, and stunning visuals throughout the years.
Moreover, the current global pandemic may have necessitated adjustments to the game’s development, impacting its release schedule. However, it is crucial to remember that delays in game launches are not uncommon and often result in better polished and refined products for players to enjoy.
As we await further updates on the release of Assassin’s Creed Mirage, it is important to remain patient and trust that the developers are striving to deliver an unforgettable gaming experience.
How do I fix Assassin’s Creed Mirage not launching?
1.Run as an administrator
- You’re selected for Desktop showing Assassin’s Creed Mirage Game.
- After Clicking on the Mouse.
- Then Select the Properties click.
- Now, Show the top panel in Compatibility.
- After below you select the Compatibility Mode
- Next, Choose the option Windows 8.
- Below Choose this option.
✅Run this program as an Administrator
- After Apply button click the ok click.
2.Advanced system custom-size
- Go to the Search bar and click here.
- Type “About system” in the search bar and open the system
- In the System window, click on “Advanced system settings“
- This will open the System Properties dialog box.
- In the System Properties dialog, under the “Advanced” tab.
- Click on the “Settings” button in the Performance section.
- This will open the Performance Options dialog.
- In the Performance Options dialog, go to the “Advanced” tab.
- Under the “Virtual memory” section, click on the “Change…” button.
- Select the drive for which you want to set the custom page size.
- Choose the option “Custom size”.
Initial Size (in MB): RAM size * 1024 = value
Maximum Size (also in MB): Below the Same value
Click on the “Set” button, and then click “OK” to apply the changes. 3.Update the Graphics driver-
Press “win+x” after clicking in Device Manager.
-
Now open it then find Display Adapter click.
-
Then Right-click to Update driver select.
-
Now update the graphics driver.
4.Verify the integrity of the game files
-
Open the launch, Go to the library.
-
After clicking Assassin’s Creed Mirage then,
-
see the new page and select properties.
-
After opening it then select local files and click here.
-
Press and click the verify integrity of the game file
5. Clear Temp File:
- Press the win+x key, click the Run open it.
- After typing the command %localappdata% and ok click.
- Find the Temp folder or file and open it.
- Insert select all file ctrl + A press.
- Delete from this file.
6.Delete Local File Delete:
- Press the Windows key + R to open the Run dialog box.
- Type “localappdata%” and press Enter.
- Find out the Assassin’s Creed Mirage Game File.
- Navigate to the folder associated with the game you want to delete.
- Right-click on the game’s folder and select the Delete.
Conclusion:Assassin’s Creed
The baffling circumstance surrounding the non-launch of Assassin’s Creed Mirage raises important questions about the underlying reasons behind this unexpected setback.
It is evident that Ubisoft, the renowned video game publisher and developer, had high hopes for the release of this installment, which was poised to captivate dedicated fans and newcomers alike.
Yet, the unforeseen delay has left players disillusioned and desperate for answers. While speculation abounds, it is crucial for Ubisoft to promptly communicate with their loyal community, providing much-needed clarity and reassurance.
Transparency will not only instill confidence among fans but also uphold the reputation of the company, demonstrating their commitment to delivering exceptional gaming experiences.
As the anticipation continues to mount, only time will tell if the Mirage will ever carve its way into the Assassin’s Creed series, leaving enthusiasts anxiously awaiting its arrival.